Control plane setup
The control plane coordinates your MESH network. We use Docker for easy deployment.
Step 1: Clone the Repository
Step 2: Configure Headscale
Create a configuration file:
mkdir -p config
cat > config/config.yaml << EOF
server_url: https://your-domain.com
listen_addr: 0.0.0.0:8080
metrics_listen_addr: 0.0.0.0:9090

grpc_listen_addr: 0.0.0.0:50443
grpc_allow_insecure: false

private_key_path: /var/lib/headscale/private.key
noise_private_key_path: /var/lib/headscale/noise_private.key
base_domain: your-domain.com

ip_prefixes:
  - 100.64.0.0/10
  - fd7a:115c:a1e0::/48

derp:
  server:
    enabled: true
    region_id: 999
    region_code: "custom"
    region_name: "Custom DERP"
    stun_listen_addr: "0.0.0.0:3478"

  urls:
    - https://controlplane.tailscale.com/derpmap/default

  auto_update_enabled: true
  update_frequency: 24h

database:
  type: sqlite3
  sqlite:
    path: /var/lib/headscale/db.sqlite

log:
  level: info
  format: text

dns_config:
  override_local_dns: false
  nameservers:
    - 1.1.1.1
    - 8.8.8.8
  magic_dns: true
  base_domain: mesh.local

acl_policy_path: /etc/headscale/acl.yaml
EOF
Replace Configuration Values
Replace your-domain.com with your actual domain or server IP address. If you want to use your own DERP server, you should change the urls to your own. You can learn more about DERP here. We use Tailscale's DERP relay's by default.
Step 3: Create ACL Policy
Access Control Lists (ACLs) define which nodes can communicate with each other.
Permissive ACL
The default configuration allows all nodes to communicate with each other. For production deployments, see the ACL documentation for more restrictive policies.
Step 4: Start the control plane
Verify the containers are running:
You should see containers for:
headscale- The control plane serverheadscale-ui- The web management interface
Step 5: Access the Web UI
The control plane includes a web-based management interface. Access it at:
- Local access:
https://localhost:3000/login - Remote access:
https://your-domain:8443/login
Self-Signed Certificate
The web UI uses a self-signed certificate by default. Your browser will show a security warning - this is expected. Click "Advanced" and proceed to the site. You should use a reverse proxy to serve the web UI over HTTPS. It is required for the control plane to be accessible on HTTPS publicly
Step 6: Create an API Key
Before using the web UI, create an API key:
Example output:
Copy your API key
Copy this key immediately - you won't be able to see it again.
Step 7: Connect to the Web UI
- Open the web UI in your browser
- Enter your Ccntrol plane URL:
http://localhost:3000 - Paste your API Key from Step 6
- Click ACCESS SYSTEM
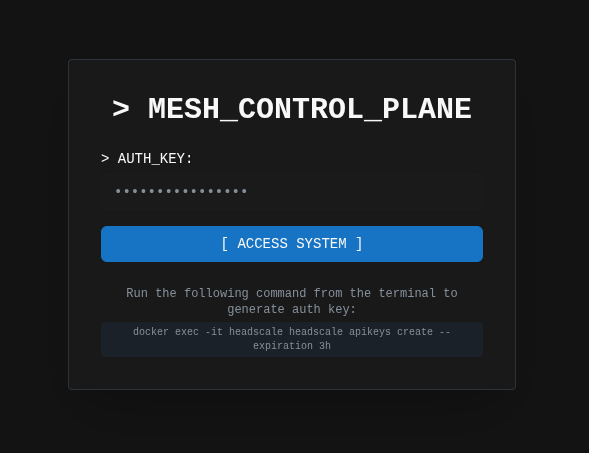
You're now connected to the control plane.
Step 8: Create a new network
Before creating pre-authentication keys for nodes, you need to create a network (or namespace). This should be the network that you'll join nodes to for a forensics mesh.
Using the Web UI (Recommended):
- Navigate to the [ NEW NETWORK ] tab in the sidebar

- Enter the details for the forensics mesh you're wanting to create

- Your network is now created and ready for nodes

- (Optional) Modify ACLs to ensure nodes are segregated properly
For production deployments, see the ACL documentation.
Step 9: Create a Pre-authentication key
Pre-auth keys allow nodes to join the mesh without interactive authentication. You'll need this key to connect clients.
- Click the [ GENERATE KEY TO ADD CLIENTS ] tab
- Select which type of node you want to create

- Configure the key accordingly:
- Reusable: allows multiple devices to use the same key
- Ephemeral: destroys the node after disconnecting
- Expiration: 24 hours (or longer for your use case)
- Click GENERATE
- Copy the key immediately - you won't see it again. Use this for your analyst node connection, or send to your client for a forensics node endpoint.
Save Your Pre-auth key
Save this key securely - you'll need it to connect both the analyst client and endpoint clients to the mesh.
Verification
Verify your control plane is running correctly:
# Check container status
docker ps

# Check control plane logs
docker logs headscale

# Test API endpoint
curl http://localhost:8080/health
Next steps
Your control plane is now ready. The next step is to install the analyst client on your acquision node.
For detailed control plane configuration, see the Control plane documentation.